
التكنولوجيا والمستقبل

النظارات الثلاثية الابعاد 3D
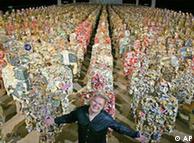
في العام 2009 اثيرت ضجة كبيرة حول الفلم الذي سيقلب الموازين وعالم التصوير وصالات السينما وكان هذا الفلم هو افتار Avatar

الفلم بحد ذاتة وبقصتة المكررة في عدة افلام سابقة لم تكن سبب نجاح الفلم والذي كان يعتبر اول فلم سينمائي كامل يصور ويعرض بطريقة التصوير ثلاثي الابعاد 3D وهنا انتشرت اعلانات للترويج لمثل هكذا افلام والى النظارات الخاصة بهذه الافلام والتي وصفت بأنها ذات اسلوب رؤية مميز للشخص الذي يرتديها بحيث يبدو وكأنه جالس وسط الحدث الحقيقي كما في هذه الصورة .

وكانت النظارات وقتها قد لفتت وشدت نظري وتفكيري ..؟كيف هو شكلها ؟ ما المميز فيها عن مثيلاتها من النظارات الاعتيادية ؟ وكيفية صناعتها ؟ ولكن الحقيقة انني لم ابحث عن هكذا امور في وقتها حيث كنت مقبلا على الامتحانات النهائية وكذالك بعدها في عطلة الصيف ولكن وفي اول اسبوع من العام الجديد بحثت عن الموضوع وتبين انة شديد السهولة مجرد طبقتين من غلاف الملازم الملون الشفاف كانت النظارة الاصلية بهذا الشكل
 النظارة الاصلية
.jpg)
نظارتي المصنوعة منزليا
طبعا اكيد اكو فرق بالالوان والصناعة والشكل بس الانسان يعمل شي احسن من ماكو .
خدمة الفيس بوك الجديدة
Facebook prisoners
فيس بوك للمساجين
facebook قام بإطلاق خدمة جديدة خاصة بالسجناء فى محاولة للترفيه عنهم خلف قضبان السجن كما أفادت دراسة حديثة أجراها مركز " Pew Center " بأن عدد المحتجزين فى سجون الولايات المتحدة الأمريكية يقدر ب 2,3 مليون سجين ؛ حيث يتعرض للاعتقال واحد من كل 100 مراهق أمريكي . وهو معدل يزيد بنسبة 300 % عن عدد السجناء قبل 20 عاما (500 ألف سجين) .
يوفر الخدمة موقع WriteAPrisoner.com الذي يتيح للسجناء خدمات التصفح الإلكتروني عبر "فيس بوك السجناء" ويعطي الفرصة أمام المستخدمين لكتابة رسائل دعم للسجناء للشد من أزرهم، بجانب التواصل مع عائلات المعتقلين

ونجحت المبادرة في جذب انتباه خمسة آلاف و600 مستخدم حتى الآن من السجناء وأصدقائهم خارج الأسوار، علما بأن 8.4% من المستخدمين سيدات .
.. وفى رأى انه هذه الفكره تم تنفيذها خصيصا للتقليل من المشاجرات بين السجناء نظرا لارتفاعها فى سجونهم .
الثورة العلمية المتمثلة فيما يسمى بالتكنولوجيا الحديثة أثرت كثيرا في حياة الانسان واصبحت مقياسا للتقدم الذي وصلت اليه العقول البشرية الفذة، حيث لا يكاد يمر يوم إلا ونسمع فيه عن اختراع آلة تكنولوجية متطورة أو أكثر تطورا وذكاء من سابقاتها، بل اصبح كل فرد لايستطيع ان يستغني عن استخدام التكنولوجيا سواء في حياته العلمية او حياته العمليه لانه سوف يفقد الكثير بفقدان ادوات واشكال التكنولوجيا.
الاشكال المختلفة للتكنولوجيا من كمبيوتر وهواتف نقالة وحواسيب وانترنت .. الخ سهلت التقارب بين البشر وألغت الحدود المصطنعة بين البلدان، بل قدمت حلول كثيرة واختصرت المسافات ومكنت الانسان من انجاز الكثير من المشاريع التي كانت فيما مضى مستحيلة وارشدت الانسان الى الكثير من الاختراعات والمعارف والعلوم، كما انها سمحت لانسان بإستغلال الوقت وتقليل التكاليف وانجاز الاعمال والمهام بسرعة فائقة والحصول على معلومات هائلة ومتعددة في اوقات قياسية.
الاشكال المختلفة للتكنولوجيا من كمبيوتر وهواتف نقالة وحواسيب وانترنت .. الخ سهلت التقارب بين البشر وألغت الحدود المصطنعة بين البلدان، بل قدمت حلول كثيرة واختصرت المسافات ومكنت الانسان من انجاز الكثير من المشاريع التي كانت فيما مضى مستحيلة وارشدت الانسان الى الكثير من الاختراعات والمعارف والعلوم، كما انها سمحت لانسان بإستغلال الوقت وتقليل التكاليف وانجاز الاعمال والمهام بسرعة فائقة والحصول على معلومات هائلة ومتعددة في اوقات قياسية.
الوعي الألماني يحول القمامة إلى ثروة
تعتبر ألمانيا البلد الأشد صرامة في العالم من ناحية القوانين البيئية، فهي أول دولة يدخل بها حزب "الخضر" إلى البرلمان. كما أنها تطبق نظاماً دقيقاً في فرز الفضلات الذي يجد القادم إلى ألمانيا بعض الصعوبة في فهمه وتطبيقه في بداية الأمر. ولكن معرفة ما توفره هذه المشاركة الفردية يوفر على المدى البعيد المال ويحافظ على المواد الخام، كما يساعد على حماية البيئة من التلوث. فالفرد ينتج في ألمانيا في المتوسط عشرة كيلوجرامات من الفضلات يومياً، كما يستهلك ما يزيد على 600 لتراً من المياه. وإذا تم التخلص من كل هذه النفايات بالطريقة المعتادة وهي حرقها فسيلوث الجو، كما ستهدر طاقة كبيرة من أجل حرق هذه النفايات. فإما أن تصرف الدولة الملايين للتخلص من هذه الفضلات، أو تستثمرها وتعيد تصنيعها، وبالفعل اختارت ألمانيا الحل الثاني والذي يوفر لها سنوياً مليارات اليوروهات، وعلى هذا النحو أنشأت صناعة كاملة معتمدة على إعادة تصنيع النفايات. ويتطلب هذا الأمر أن تصنع العبوات والمنتجات منذ البداية بطريقة تسمح بإعادة تصنيعها، وهذه العبوات تحمل علامة خضراء مميزة. ولكن هذا المشروع لا يمكن إتمامه بدون مشاركة من كل فرد في المجتمع.
فصل المهملات أمر يجب تعلمه
 تكرر هذا المشهد أمامي عدة مرات، فكلما يأتي أحد الأقارب أو الأصدقاء لزيارتنا في ألمانيا، تحدث حالة ارتباك. أجدهم واقفين أمام صندوق القمامة في حالة من الحيرة، لا يعرفون في أي قسم يلقون بهذا الشيئ. وتزداد حيرتهم عندما أقول لهم لا، إن هذا الشيء لا يجب إلقاؤه في هذا الصندوق على الإطلاق، فهذا له صندوق آخر خاص به. وفي الواقع، فقد استغرق الأمر مني أنا أيضاً وقتاً طويلاً حتى فهمت أين علي أن ألقي الفضلات المختلفة. فالقمامة مقسمة لأربعة أقسام أساسية بالإضافة إلى صناديق خاصة، هذا بالإضافة للزجاجات البلاستيكية والزجاجية والتي يجب إعادتها إلى السوبرماركت، فعلى كل زجاجة رهن، يعاد عند إرجاع هذه الزجاجات، وهذا هو أحد القوانين التي فرضتها الحكومة لتشجيع الأفراد على المشاركة في هذا المشروع القومي.
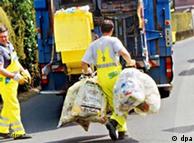 جمع نفايات العبواتأما صناديق القمامة ذات الألوان المختلفة فهي المرحلة الأولى للتعرف على هذا النظام، فهناك أربعة ألوان رئيسية، فالصندوق الأزرق هو الأسهل، فهذا هو الصندوق حيث تلقى الأوراق، والورق المقوى، أما الصندوق الأصفر، فهو صندوق العبوات، البلاستيكية والمعدنية. ويزداد الأمر تعقيداً مع الصندوق الأخضر، فهو صندوق الفضلات العضوية، وهذا يعني المواد الغذائية غير المطبوخة أحياناً، والمطبوخة أيضاً في بعض الولايات، وهناك ورقة تحوي التعليمات معلقة على كل صندوق. فبقايا الفواكه والخضروات تستخدم كسماد، ولذلك فممنوع استخدام أكياس بلاستيكية في هذا الصندوق، فهناك أكياس ورقية خاصة من الورق المعاد تصنيعه، والتي تذوب بعد عدة أيام حتى لا تؤثر على هذا السماد الطبيعي الذي ينتج من القمامة. والبقية تذهب إلى الصندوق الأسود. ولكن لم ينته الأمر بعد!!!
"نفايات" أخرى
 صناديق القمامة بألوانها المختلفةللزجاج صناديق خاصة، ويتم فرزه حسب اللون، الزجاج الأبيض وحده والبني في مكان آخر والأخضر في مكان ثالث. وبالطبع غير مسموح بإلقاء الزجاج بعد الساعة الثامنة مساءاً، فهذا أمر مزعج، والحفاظ على البيئة يستدعي أيضاً الحفاظ على الهدوء وراحة السكان في المنطقة. أما البطاريات، فتلقى في صناديق خاصة في السوبر ماركت. وبالطبع لا تنتمي فضلات الكمبيوتر إلى هذه الصناديق، فلها صندوق خاص، تلقى فيه الأسطوانات المدمجة والديسكات، والأدوات الالكترونية بصفة عامة، وهذه هي الصناديق الحمراء والتي توجد في مناطق محدودة من بينها المحلات التجارية المتخصصة في بيع هذه المنتجات.
 بدون تعاون من الأفراد لا يمكن تنفيذ هذا المشروعأما الفضلات الكبرى كقطع الأثاث، أو الأجهزة الكهربائية فهي تترك في الشارع في "مواعيد التخلص من النفايات الكبرى". وهذه المواعيد توزع في كراس يوزع على كل أسرة، لتعرف هذا الموعد الذي تنتظره أحياناً بفارغ الصبر لتتخلص من الأشياء المزعجة بالمنزل. ولكن، أحياناً ما تكون هذه الأشياء في حالة جيدة جداً! ولذلك فهذه "الفضلات" تترك على الأرصفة لمدة يوم كامل، لتتاح الفرصة لمن يرغب في أخذ ما يحتاجه منها. وفي الواقع هناك العديد من الناس الذين يقومون بفرش منزلهم بالكامل من هذا الأثاث المستعمل، بل وقد تجد أجهزة كهربائية، عيبها الوحيد أن"موديلها" قديم.
المهرجانات فرصة للتحرر من القواعد
 رجال النظافة يقومون بعملهمحقاً إن حماية البيئة أمراً هاماً ولكنه أحياناً ما يكون أمراً متعباً يحتاج إلى مجهود وتنظيم، ولذلك فقد يرغب المرء لوقت يرتاح فيه من الحرص على أن يلقي كل شيء في مكانه المخصص. وفي الواقع لا يقتصر الأمر على هذا السبب، ولكن في المهرجانات الكبرى حيث يتجمع مئات الآلاف من الأشخاص، لا يمكن مطالبة كل شخص بالاحتفاظ بالقمامة في يده حتى يصل إلى صندوق القمامة. لذلك تعتبر هذه الاحتفالات فترات استثنائية يمكن إلقاء الفضلات فيها في الشارع. وتأتي العربات الخاصة بعد نهاية المهرجان لتنظيف المكان.
تقنية جديدة تحول حرارة جسم الإنسان إلى طاقة كهربائية
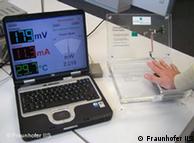
كثيراً ما ينقطع الاتصال أثناء مكالمة هامة عبر الهاتف المحمول بسبب انقطاع التيار الكهربائي الصادر عن البطارية، والحاجة إلى إعادة شحنها، أو يحدث مثلاً أن نكتشف بعد فوات الأوان أن موعداً هاماً قد فاتنا، لأن ساعة اليد قد توقفت فجأة عن العمل. ولكن هل من الممكن تخيل القيام باتصالات عبر الهاتف المحمول دون الحاجة إلى بطارية، فقط بالاعتماد على حرارة الجسم؟ قد تبدو هذه الفكرة أقرب إلى الخيال العلمي، إلا أنها قد تتحول إلى حقيقة، بعد أن تمكنت مجموعة من العلماء من معهد فراونهوفر الألماني من التوصل إلى طريقة جديدة لتحويل حرارة الجسم إلى تيار كهربي.مبدأ علمي قديم وتطبيقات جديدةتعتمد هذه التقنية على مبدأ علمي معروف منذ عام 1821، اكتشفه عالم الطبيعة الألماني توماس سيبيك، كما أكد بيتر شبيس، أحد الباحثين المشاركين بالمشروع، في حديث لموقعنا قائلاً: "المبدأ معروف منذ زمن، وهو ما يطلق عليه المولد الكهروحراري، والذي يعمل بناء على ما يسمى بتأثير سيبيك، أو التأثير الكهروحراري. عن طريق هذا المولد يمكن تحويل الفارق بين درجتي الحرارة بين جسمين مختلفين إلى طاقة كهربائية، أو إلى فرق جهد كهربي. وقد طورنا دوائر كهربية جديدة يمكنها أن تحول هذا الفرق الصغير في الجهد الكهربي إلى فرق جهد كبير، أي إلى تيار كهربي كبير، يمكن الاعتماد عليه لتشغيل الأجهزة الالكترونية المعروفة".طاقة الجسم بدلاً من البطاريات هل يمكن الاستغناء عن البطاريات في المستقبل؟هناك بالفعل جهاز تجريبي لهذه التقنية في معهد فراونهوفر، حيث يمكن للمرء بوضع يده على الجهاز أن يولد كمية من الطاقة كافية لتشغيل مجسات حرارة ولإرسال المعلومات لاسلكياً، كما أن هناك بعض التطبيقات العملية التي تمت في المجال الصناعي، وإن كانت حتى الآن محدودة، وفي هذا الإطار، يقول شبيس: "الأمر يتعلق بالطبع بمدى كفاءة الدوائر المستعملة. وفي الوقت الحالي، مازالت الطاقة التي يمكن اكتسابها من حرارة الجسم محدودة، وتكفي مثلا ً لتشغيل ساعة يد، أو جهاز لقياس النبض، أو أشياء من هذا القبيل".
يمكن لهذه التقنية أن تخدم المرضى المستلقين على فراشهم في العناية المركزة، والمحاطين بالأسلاك من كل جانب، إذ أن هذه الأجهزة التي تعمل بالكهرباء لقياس ضغط الدم أو سرعة ضربات القلب أو حرارة الجسم، يمكن استبدالها بأجهزة تعمل بالتيار الكهربي المولد من جسم الإنسان نفسه، كما يمكن أن ترسل هذه الأجهزة بالمعلومات الخاصة لاسلكياً لوحدة المراقبة الطبية أو للطبيب المعالج.هاتف المستقبل - هل يعمل دون بطارية؟
 في المستقبل البعيد، قد يمكن تشغيل الهاتف الجوال دون الحاجة إلى بطاريات...وتطبيقات هذه التقنية وإن كانت مازالت محدودة حتى الآن نظراً للكمية الصغيرة من الطاقة التي يمكن توليدها، إلا أنه مع الأخذ بالاعتبار التطورات التي تحدث على الدوائر الكهربائية، والتي تجعلها أكثر كفاءة، يمكن تخيل أن تستخدم هذه التقنية في عدد أكبر من الأنظمة. الأمر الذي يؤكده شبيس قائلاً إنه في المستقبل القريب يمكن تخيل الاستغناء تماماً عن البطاريات في بعض الأجهزة أو الاحتياج إلى شحنها بمعدلات أقل.
ومن بين الأجهزة التي يمكن مستقبلاً أن تعتمد على تلك التقنية، جهاز الهاتف الجوال، وإن كان هذا الأمر في رأي شبيس مازال حلماً بعيداً، حيث يقول: "الأمر أصعب فيما يتعلق بالهواتف النقالة، لأنها تحتاج حتى الآن إلى كمية كبيرة من الطاقة لتشغيلها، لكن بفضل التطور التقني في تصنيعها، والذي يعمل على تخفيض كمية الطاقة اللازمة لتشغيها بشكل كبير، يمكن أن نتخيل أن يتحقق هذا الأمر في المستقبل البعيد".
كثيراً ما ينقطع الاتصال أثناء مكالمة هامة عبر الهاتف المحمول بسبب انقطاع التيار الكهربائي الصادر عن البطارية، والحاجة إلى إعادة شحنها، أو يحدث مثلاً أن نكتشف بعد فوات الأوان أن موعداً هاماً قد فاتنا، لأن ساعة اليد قد توقفت فجأة عن العمل. ولكن هل من الممكن تخيل القيام باتصالات عبر الهاتف المحمول دون الحاجة إلى بطارية، فقط بالاعتماد على حرارة الجسم؟ قد تبدو هذه الفكرة أقرب إلى الخيال العلمي، إلا أنها قد تتحول إلى حقيقة، بعد أن تمكنت مجموعة من العلماء من معهد فراونهوفر الألماني من التوصل إلى طريقة جديدة لتحويل حرارة الجسم إلى تيار كهربي.
مبدأ علمي قديم وتطبيقات جديدة
تعتمد هذه التقنية على مبدأ علمي معروف منذ عام 1821، اكتشفه عالم الطبيعة الألماني توماس سيبيك، كما أكد بيتر شبيس، أحد الباحثين المشاركين بالمشروع، في حديث لموقعنا قائلاً: "المبدأ معروف منذ زمن، وهو ما يطلق عليه المولد الكهروحراري، والذي يعمل بناء على ما يسمى بتأثير سيبيك، أو التأثير الكهروحراري. عن طريق هذا المولد يمكن تحويل الفارق بين درجتي الحرارة بين جسمين مختلفين إلى طاقة كهربائية، أو إلى فرق جهد كهربي. وقد طورنا دوائر كهربية جديدة يمكنها أن تحول هذا الفرق الصغير في الجهد الكهربي إلى فرق جهد كبير، أي إلى تيار كهربي كبير، يمكن الاعتماد عليه لتشغيل الأجهزة الالكترونية المعروفة".
طاقة الجسم بدلاً من البطاريات
هل يمكن الاستغناء عن البطاريات في المستقبل؟هناك بالفعل جهاز تجريبي لهذه التقنية في معهد فراونهوفر، حيث يمكن للمرء بوضع يده على الجهاز أن يولد كمية من الطاقة كافية لتشغيل مجسات حرارة ولإرسال المعلومات لاسلكياً، كما أن هناك بعض التطبيقات العملية التي تمت في المجال الصناعي، وإن كانت حتى الآن محدودة، وفي هذا الإطار، يقول شبيس: "الأمر يتعلق بالطبع بمدى كفاءة الدوائر المستعملة. وفي الوقت الحالي، مازالت الطاقة التي يمكن اكتسابها من حرارة الجسم محدودة، وتكفي مثلا ً لتشغيل ساعة يد، أو جهاز لقياس النبض، أو أشياء من هذا القبيل".يمكن لهذه التقنية أن تخدم المرضى المستلقين على فراشهم في العناية المركزة، والمحاطين بالأسلاك من كل جانب، إذ أن هذه الأجهزة التي تعمل بالكهرباء لقياس ضغط الدم أو سرعة ضربات القلب أو حرارة الجسم، يمكن استبدالها بأجهزة تعمل بالتيار الكهربي المولد من جسم الإنسان نفسه، كما يمكن أن ترسل هذه الأجهزة بالمعلومات الخاصة لاسلكياً لوحدة المراقبة الطبية أو للطبيب المعالج.
هاتف المستقبل - هل يعمل دون بطارية؟
في المستقبل البعيد، قد يمكن تشغيل الهاتف الجوال دون الحاجة إلى بطاريات...وتطبيقات هذه التقنية وإن كانت مازالت محدودة حتى الآن نظراً للكمية الصغيرة من الطاقة التي يمكن توليدها، إلا أنه مع الأخذ بالاعتبار التطورات التي تحدث على الدوائر الكهربائية، والتي تجعلها أكثر كفاءة، يمكن تخيل أن تستخدم هذه التقنية في عدد أكبر من الأنظمة. الأمر الذي يؤكده شبيس قائلاً إنه في المستقبل القريب يمكن تخيل الاستغناء تماماً عن البطاريات في بعض الأجهزة أو الاحتياج إلى شحنها بمعدلات أقل.ومن بين الأجهزة التي يمكن مستقبلاً أن تعتمد على تلك التقنية، جهاز الهاتف الجوال، وإن كان هذا الأمر في رأي شبيس مازال حلماً بعيداً، حيث يقول: "الأمر أصعب فيما يتعلق بالهواتف النقالة، لأنها تحتاج حتى الآن إلى كمية كبيرة من الطاقة لتشغيلها، لكن بفضل التطور التقني في تصنيعها، والذي يعمل على تخفيض كمية الطاقة اللازمة لتشغيها بشكل كبير، يمكن أن نتخيل أن يتحقق هذا الأمر في المستقبل البعيد".
تطوير صمامات اصطناعية قادرة على النمو مع جسم الأطفال

نجح فريق من الباحثين السويسريين في المستشفى الجامعي في زيورخ في تطوير صمامات قلب اصطناعية في المختبر وزرعها في جسم عنزة أجريت عليها الدراسة. وقام العلماء بتطوير هذه الصمامات من خلال استخدام خلايا جذعية مأخوذة من عنق العنزة. وبعد النجاح الهائل الذي حققته هذه التجربة، يسعى البروفسور سيمون هورشتروب، المتخصص في جراحات القلب إلى تطوير صمامات قلوب بشرية، الأمر الذي يفتح الطريق أمام إصلاح العديد من التشوهات الخلقية في القلب، خاصة لدى الأطفال حديثي الولادة.
الأطفال هم الهدف الأول من تطوير هذه الصمامات الحديثة
 الماعز التي تم إجراء التجربة عليها تبدو بصحة جيدةحتى وقتنا الحاضر يستخدم الجراحون صمامات اصطناعية بديلة مصنوعة من مواد غير حية تفادياً للأضرار التي يمكن أن تنشأ بسبب رفض الجسم للخلايا "الغريبة". هذه البدائل لا يمكنها أن تنمو ويتغير شكلها مع نمو الطفل، الأمر الذي يتسبب في إعادة عملية زرع الصمامات للطفل أكثر من مرة لتتناسب مع نموه، وقد يحتاج الطفل الذي يعاني من تشوه في القلب إلى خمسة علميات على الأقل حتى يصل إلى سن البلوغ.
ويسعى الجراح السويسري سيمون هورشتروب إلى إيجاد حل لإنقاذ حياة هؤلاء الأطفال، وذلك من خلال التجارب التي يجريها على الماعز باعتبارها "مثالا نموذجيا" لهذه الاختبارات على حد قوله، لأن تشريح جسم الماعز يتشابه مع تشريح الجسم البشري. وأضاف البروفسور هورشتروب أن”خلايا الماعز تتكلس وتتصلب مباشرة في حال حصول أي خلل في سير عملية تطوير الصمام وزراعته"، مما يعني أن نتائج علميات الزرع تظهر على الماعز بشكل أسرع منه لدى الإنسان.
طريقة تطوير الصمامات الحديثة
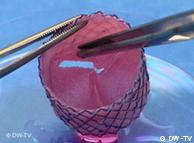 قالب مصنوع من مواد حيوية قابلة للتحلل على شكل صمام القلب، يتم زرع الخلايا الجذعية فيه لتشكيل النسيج الخلوي الخاص بصمامات القلبوتقوم الطريقة الجديدة في تطوير الصمامات الصناعية الحديثة على استخدام خلايا مأخوذة من الأوعية الدموية لعنق الماعز. وتزرع هذه الخلايا في قالب مصنوع من مادة قابلة للتحلل الحيوي مصمم على شكل صمام قلب، وبعد عمليات التحول الحيوي تنمو هذه الخلايا وتتطور في القالب لتأخذ شكل صمام القلب وتستغرق هذه العملية حوالي ثمانية أسابيع.
وتستمر عملية التحلل الغذائي خلال عملية نمو وتطور الخلايا الجذعية لمحاكاة مضخة القلب، وبذلك يتم تدريب الصمام الاصطناعي على عمله المستقبلي في ضخ الدم إلى الشرايين والأوردة. ولأن هذه الصمامات التي تمت صناعتها بشكل كامل داخل المختبر مأخوذة من الخلايا الجذعية للعنزة، فقد تقبل جسمها هذه الصمامات بسهولة، وهي في حالة صحية جيدة.
آمال كبيرة في إمكانية نجاح زرع هذه الصمامات الحديثة لدى الإنسان
ويأمل البرفسور هورشتروب في أن تحقق هذه التجربة نجاحاً مستقبلياً مماثلاً لدى الأطفال الذين يعانون من تشوهات خلقية في القلب. ومن الجدير بالذكر أن الباحثون في جامعة زيورخ نجحوا في صناعة حوالي 100 صمام بشري، وهم في انتظار اللحظة التي يتم فيها زراعة هذه الصمامات داخل جسم أول طفل، لكن هذا الأمر قد يستغرق بضعة أعوام.
علماء ألمان يستلهمون من الخنافس أنظمة إنذار مبكر من الحرائق
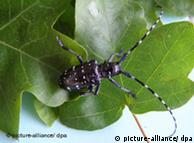
مازال العلماء يتابعون الطبيعة ويسعون إلى تقليدها والتعلم منها، وقد لفتت خنافس شجرة الصنوبر السوداء أنظارهم، كونها تستطيع أن "تسمع النيران"، كما يؤكد الباحث سابيش كلوكه، من معهد علم الحيوان في جامعة بون. ويضيف كلوكه، الذي يدرس الحشرات التي تستطيع تنقذ حياتها أثناء الحرائق قائلاً في حديث لدويتشه فيله: " أحاول أن أدرس أجهزة تلك الحشرة لأعرف كيف تعمل حواسها وكيف يمكنها أن تتفادى النيران، وكيف يمكنها أن تستشعر الأشعة تحت الحمراء التي تصدر عن النيران".
مجسات شبيهة بأجهزة الاستشعار لدى الخنفساء
 الدكتور شميتس والباحث كلوكهويركز كلوكه دراسته، تحت إشراف الأستاذ الدكتور هيلموت شميتس، على الخنافس السوداء، التي تعيش في الغابات ولا تهرب من الحريق على عكس بقية الحيوانات، بل تبحث عن النيران، إذ أن يرقاتها تتغذى على الأخشاب المحترقة حديثاً. وتستطيع تلك الحشرات الصغيرة أن تستشعر الحرائق على بعد 80 كيلومتراً عن طريق أجهزة استشعار خاصة. وقد تمكن فريق البحث العامل مع الدكتور شميتس من التعرف على كيفية عمل تلك الأجهزة، على أمل التمكن من تقليدها، حسبما يؤكد الأستاذ المشرف على البحث قائلاً: "نحن نسعى بالتعاون مع الباحثين في علوم الأحياء إلى بناء الأنظمة الميكروميكانيكية الشبيهة بتلك التي تملكها الخنفساء، ونتعلم من أجهزة الاستشعار الخاصة بها لبناء مجسات أفضل من تلك الموجودة حالياً، معتمدين في ذلك على الطريقة الخاصة جداً التي تعمل بها حواس الخنافس".
تطبيقات متعددة
 إخضاع الخنفساء للدراسة للتعرف على نظام الاستشعار لديها أجهزة الاستشعار الخاصة بالخنافس تتميز بحساسية شديدة بالإضافة إلى صغر حجمها، وهي أسرع بخمس مرات من أي مجس تم ابتكاره حتى الآن كما أن لها ميزة خاصة جداً، فهي تستطيع أن "تسمع" الحريق. فجهاز الاستشعار الخاص بها يتلقى الأشعة تحت الحمراء الصادرة عن النيران، وتتسبب تلك الأشعة في تسخين السوائل التي تملأ خلايا الاستشعار لدى الخنفساء، فيرتفع الضغط بها، وتسجل الحشرة ذلك التغير، وتتخذ رد فعل بسرعة كبيرة. ويتمنى العلماء أن يتمكنوا من تقليد تلك الخواص في المجسات الجديدة التي يقومون بتطويرها. أما عن مجالات استخدام تلك الأجهزة المستقبلية، فهي كثيرة كما يؤكد الدكتور شميتس قائلاً: "من الممكن مثلاً استخدامها لاستشعار حرائق الغابات وتفاديها، كما يمكن استخدامها أيضاً كإنذار للحرائق في المنازل". لكن تلك المجسات مازالت في طور التطوير والتجربة، ولا يعرف فريق البحث بعد متى سيدخل هذا المشروع حيز التطبيق العملي.
ثنائي باعث للضوء أو ديود باعث للضوء (بالإنجليزية: LED ) هو مصدر ضوئي يبعث الضوء حينما يمر به تيار كهربائي . يرجع تطويره إلى الستينات من القرن العشرين عندم أكتشاف أنصاف الموصلات . في البدأ كان يبعث ضوءا واحدا ضعيفا ، لكن مع الوقت أمكن تطويره لبعث الثلاثة ألوان المستخدمة كثيرا في التكنولوجيا اليومية ، الأحمر والأزرق والأصفر . وكثيرا ما يـُستعمل في أللوحات الكبيرة المنيرة وغيرها .وأصبح لها طاقة كبيرة على إصدار ضوءا ناصعا ً .
ابتكار الثنائي
اخترعه الياباني شوجي ناكامورا وبدأ ابتكاره على إثر اختراع أنصاف الموصلات التي ازداد استعمالها في النصف الثاني من القرن الماضي في الحاسوب .ففى الثنائي الضوئي بتأثير التيار الكهربائي تقفز إلكترونات الذرة من حالة كمومية عالية الطاقة إلى حالة كمومية منخفضة، فيصدر الإلكترون فارق الطاقة بين الحالتين على هيئة فوتون أي شعاع ضوء ذو تردد محدد وبالتالي له طول موجة محددة . وباختيار مادة الثنائي يمكن الحصول على لون الضوء الصادر منه وهذا الاختيار يتعلق باختيار المدارين الذريين الذي يقفز من أحدهما الإلكترون إلى المدار الآخر المنخفض . فهذا الفارق يحدد طول موجة الشعاع الذي يطلقة الإلكترون عند قفزته وبالتالى لون الشعاع ، ونال بسبب هذا الاختراع جائزة الألفية للتكنلوجيا في سنة 2006.
الثنائي باعث للضوء -واختصاره بالأنجليزية LED - له ميزات كثيره يتفوق بها عن الوسائل المعتادة للإضاءة . فهو يستهلك قليلا من الطاقة الكهربائية ويمكن تشغيله ببطاريات صغيرة ، وعمره طويل ويتحمل الصدمات وصغير الحجم فهو لايزيد عن 5 مليمتر في مقاييسه . إلا أنه مايزال باهظ الثمن نسبيا ، كما أنه يحتاج إلى مصدر كهربائي ذو تيار ثابت ، وأنظمة لتشتيت الحرارة المنبعثة منه .
كل تلك الميزات أفسحت المجال لاستخدام الديود باعث الضوء في مجالات لا تستطيع وسائل الإضاءة التقليدية القيام بها ، وعلى الأخص تلك التطبيقات القائمة على مصادر صغيرة للطاقة . و على الرغم من ارتفاع ثمنه نسبيا فتـُجرى البحوث في تطويره للقيام بوظائف خاصة عدا مجرد الإضاءة ، و مايزال طريق تطويره مفتوحا ً.

دائرة الثنائي باعث الضوء
في الإلكترونيات ، تكون الدائرة الأساسية هي دائرة ليد (LED) التي تستخدم لإضاءة الصمام الثنائي . وهو يتألف من عنصرين لهما وصلة في سلسلة :
مع جهد المصدر ، ومفتاح لفتح الدائرة (الثنائي يطفأ) وإغلاق الدائرة (الثنائ يضيئ). ويمكن توصيله بجهاز تحكم فيضيئ ويطفا بصورة دورية.

تستخدم منه أعدادا كثيرة مختلفة الألوان في شاشات الإعلان.
هذه الدورة مأخوذة من الموقع الكبير

How to Make a Robot – Lesson 1: Getting Started

Lessons Menu:
- Lesson 1 – Getting Started
- Lesson 2 - Choosing a Robotic Platform
- Lesson 3 - Making Sense of Actuators
- Lesson 4 - Understanding Microcontrollers
- Lesson 5 - Choosing a Motor Controller
- Lesson 6 - Understanding Communication Methods
- Lesson 7 - Using Sensors
- Lesson 8 - Getting the Right Tools
- Lesson 9 - Assembling a Robot
- Lesson 10 - Programming a Robot
Getting Started
Welcome to the first installment of the Grand RobotShop Tutorial, a series of 10 lessons that will teach you how to make your own robot. This tutorial is aimed at anybody willing to get started in robotics and have a basic understanding of terms such as “voltage”, “current”, “motor”, and “sensors”. Although this might seem pretty basic, even people with previous robot building experience might find useful information regarding the general method of building a robot.
What is a robot?
There are many definitions of robot and no real consensus has been attained so far. We loosely define a robot as follows:
Robot: An electromechanical device which is capable of reacting in some way to its environment, and take autonomous decisions or actions in order to achieve a specific task.
This means that a toaster, a lamp, or a car would not be considered as robots since they have no way of perceiving their environment. On the other hand, a vacuum cleaner that can navigate around a room, or a solar panel that seeks the sun, can be considered as a robotic system.
It is also important to note that the “robots” featured in Robot Wars for instance or any solely remote controlled device would not fall under this definition and would be closer to a more complex remote controlled car.
Although this definition is quite general, it might need to evolve in the future in order to keep up with the latest advancement in the field. In order to get a sens of how robotics is rapidly growing, we suggest you take a look at the RobotShop History of Robotics.
Let’s get started
This series of tutorials is intended to guide you through the steps of building a complete mobile robot.
There are 10 lessons that will be released in the following 10 weeks. Each lesson guides you through one step of making a general-purpose mobile robot. This will enable you to build your very own mobile robot in order to perform a task of your choice. Each lesson will be illustrated with an example from RobotShop experience in producing theRobotShop Rover. The lessons are intended to be read one after the other and build upon the information gained.
STEP 1
The first step is to determine what your robot should do (i.e. what is its purpose in life). Robots can be used in almost any situation and are primarily intended to help humans in some way. If you are unsure of what you want your robot to do or simply want to concentrate your efforts on specific tasks, here are some ideas:
Knowledge & Learning

In order to build increasingly complex robots, most professionals and hobbyists use knowledge they have acquired when building previous robots. Instead of building one robot, you can learn how to use individual components with the objective of building your own “knowledge library” to use to undertake a larger, more complex design in the future.
Amusement & Companionship

Building a robot is in and of itself is fun and exciting. Robotics incorporates aspects of many disciplines including engineering (mechanical, electrical, computer), sciences (mathematics and physics) and arts (aesthetics) and users are free to use their imagination. Amusing others with your creations (especially if they are user-friendly and interactive) helps others to become interested in the field.
Competitions & Contests

Competitions give the project design guidelines and a due date. They also put your robot against others in the same class and test your design and construction skills. Although many competitions are specifically for students (elementary to university), there also exist open competitions where adults and professionals alike can compete.
Autonomous life form

Humans are natural creators and innovators. The next great innovation will be to develop a fully autonomous life form that rivals or surpasses ourselves in ability and perhaps creativity. This goal is still being accomplished in small steps by individuals, research organizations and professionals.
Domestic or Professional tasks

help liberate people from unpleasant or dangerous tasks and give them more liberty and security
.Professional and Service Robots are used in a variety of applications at work, in public, in hazardous environments,
n locations such as deep-sea,
battlefields and space, just to name a few. In addition to the service areas
uch as cleaning, surveillance
, inspection and maintenanc
e utilize these robots where manual task execution is dangerous, impossible or unacceptable. Professional and Service Robots are more capable, rugged and often more expensive than domestic robots and are ideally suited for professional and/or commercial use.
Security and Surveillance

Most mobile robots are used to venture into areas where humans either should not or cannot go. Robots of various sizes (either remote controlled, semi-autonomous or fully autonomous) are an ideal choice for these tasks.
Practical Example
We anticipate that most of you following this guide have the objective of building a robot for learning and knowledge, but also for sheer fun; though many will have a specific idea or project they want to materialize.
The last major consideration is budget.
t is difficult to know exactly what people have in mind when they build their first robot;
ne might already want to build an autonomous snow removal robot,
hile another simply wants to make an intelligent clock.
simple programmable mobile
obot might cost about $100 while a more complex can be several thousands of dollars.
In this exercise,
e have chosen to make a mobile platform in order to get an understanding of motors
, sensors,
icrocontrollers and programming
, and to include a variety of sensors.
We’ll keep the budget to about $200 to $300 since we want it to be fairly complete.

How to Make a Robot – Lesson 2: Choosing a Robotic Platform

Lessons Menu:
- Lesson 1 – Getting Started
- Lesson 2 - Choosing a Robotic Platform
- Lesson 3 - Making Sense of Actuators
- Lesson 4 - Understanding Microcontrollers
- Lesson 5 - Choosing a Motor Controller
- Lesson 6 - Understanding Communication Methods
- Lesson 7 - Using Sensors
- Lesson 8 - Getting the Right Tools
- Lesson 9 - Assembling a Robot
- Lesson 10 - Programming a Robot
Choosing a Robotic Platform
Following the first lesson, you now have a basic understanding of what a robot is and what current robots normally do.
Now, it is time to decide on the type if robot you are going to build. A custom robot design often starts with a “vision” of what the robot will look like and what it will do. The types of robots possible are unlimited, though the more popular are:
- Land wheeled, tracked, and legged robots
- Aerial planes, helicopters, and blimp
- Aquatic boats, submarines, and swimming robots
- Misc. and mixed robots
- Stationary robot arms, and manipulators
This lesson is intended to help you decide what type of robot to build to best suite your mission. Since you have brainstormed on what tasks or functions you want it to accomplish (after lesson 1), you can now choose the type of robot that will best suite your needs. Below, you will find a description of all the major robot types.
Land
Land-based robots, especially the wheeled ones, are the most popular mobile robots among beginners as they usually require the least investment while providing significant exposure to robotics. On the other hand, the most complex type of robots is thehumanoid (akin to a human), as it requires many degrees of freedom and synchronizing the motion of many motors, and uses many sensors.
Wheeled Robots

Wheels are by far the most popular method of providing mobility to a robot and are used to propel many different sized robots and robotic platforms. Wheels can be just about any size, from a few centimetres up to 30 cm and more . Tabletop robots tend to have the smallest wheels, usually less than 5 cm in diameter. Robots can have just about any number of wheels, although 3 and 4 are the most common. Normally a three-wheeled robot uses two wheels and a caster at one end. More complex two wheeled robots may use gyroscopic stabilization. It is rare that a wheeled robot use anything but skid steering (like that of a tank). Rack and pinion steering such as that found on a car requires too many parts and its complexity and cost outweigh most of its advantages.
Four and six wheeled robots have the advantage of using multiple drive motors (one connected to each wheel) which reduces slip. Also, omni-directional wheels or mecanum wheels, used properly, can give the robot significant mobility advantages. A common misconception about building a wheeled robot is that large, low-cost DC motors can propel a medium sized robot. As we will see later in this series, there is a lot more involved than just a motor.
Advantages
- Usually low-cost compared to other methods
- Simple design and construction
- Abundance of choice
- Six wheels or more rival a track system
- Excellent choice for beginners
Disadvantages
- May lose traction (slip)
- Small contact area (only a small rectangle or line underneath each wheel is in contact with the ground)
Tracked Robots

Tracks (or treads) are what tanks use. Although tracks do not provide added “force” (torque), they do reduce slip and more evenly distribute the weight of the robot, making them useful for loose surfaces such as sand and gravel. Also, a track system with some flexibility can better conform to a bumpy surface. Finally, most people tend to agree that tank tracks add an “aggressive” look to the robot as well.
Advantages
- Constant contact with the ground prevents slipping that might occur with wheels
- Evenly distributed weight helps your robot tackle a variety of surfaces
- Can be used to significantly increase a robot’s ground clearance without incorporating a larger drive wheel
Disadvantages
- When turning, there is a sideways force that acts on the ground; this can cause
 damage to the surface the robot is being used on, and cause the tracks to wear
 - Not many different tracks are available (robot is usually constructed around the tracks)
- Drive sprocket might significantly limit the number of motors that can be used.
- Increased mechanical complexity (idler placement and number, # of links) and connections
Legs

An increasing number of robots use legs for mobility. Legs are often preferred for robots that must navigate on very uneven terrain. Most amateur robots are designed with six legs, which allow the robot to be statically balanced (balanced at all times on 3 legs); robots with fewer legs are harder to balance. The latter require “dynamic stability”, meaning that if the robot stops moving mid-stride, it might fall over. Researchers have experimented with monopod (one legged “hopping”) designs, though bipeds (two legs), quadrupeds (four legs), and hexapods (six legs) are the most popular.
Advantages
- Closer to organic or natural motion
- Can potentially overcome large obstacles and navigate very rough terrain
Disadvantages
- Increased mechanical, electronic and coding complexity (not the easiest way to get into robotics).
- Lower battery size despite increased power demands
- Higher cost to build
Air

A AUAV (Autonomous Unmanned Aerial Vehicle) is very appealing and is entirely within the capability of many robot enthusiasts. However, the advantages of building an autonomous unmanned aerial vehicles, especially if you are a beginner, have yet to outweigh the risks. When considering an aerial vehicle, most hobbyists still use existing commercial remote controlled aircraft. On the professional side, aircraft such as the US military Predator were initially semi-autonomous though in recent years Predator aircraft have flown missions autonomously.
Advantages
- Remote controlled aircraft have been in existence for decades (so there is a large community, at least for the mechanics)
- Excellent for surveillance
Disadvantages
- The entire investment can be lost in one crash.
- Limited robotic community to provide help for autonomous control
Water

An increasing number of hobbyists, institutions and companies are developing unmanned underwater vehicles. There are many obstacles yet to overcome to make underwater robots attractive to the wider robotic community though in recent years, several companies have commercialized pool cleaning “robots”. Underwater vehicles can use ballast (compressed air and flooded compartments), thrusters, tail and fins or even wings to submerge. Other aquatic robots such as pool cleaners are useful commercial products.
Advantages
- Most of our planet is water, so there is a lot to explore and discover
- Design is almost guaranteed to be unique
- Can be used and/or tested in a pool
Disadvantages
- Robot can be lost many ways (sinking, leaking, entangled…)
- Most electronic parts do not like water (also consider water falling on electronics when accessing the robot after a dive)
- Surpassing depths of 10m or more can require significant research and investment
- Very limited robotic community to provide help
- Limited wireless communication options
Miscellaneous and hybrid combinations

Your idea for a robot may not fall nicely into any of the above categories or may be comprised of several different functional sections. Note again that this guide is intended for mobile robots as opposed to stationary or permanently fixed designs (other than robotic arms and grippers). It is wise to consider when building a hybrid design, to use a modular design (each functional part can be taken off and tested separately). Miscellaneous designs can include hovercraft, snake-like designs, turrets and more.
Advantages
- Designed and built to meet specific needs
- Multi-tasking and can be comprised of modules
- Can lead to increased functionality and versatility
Disadvantages
- Possible Increased complexity and cost
- Often times, parts must be custom designed and built
Arms & Grippers

Although these do not fall under the category of mobile robotics, the field of robotics essentially started with arms and end-effectors (devices that attach to the end of an arm such as grippers, electromagnets etc). Arms and grippers are the best way for a robot to interact with the environment it is exploring. Simple robot arms can have just one motion, while more complex arms can have a dozen or more unique degrees of freedom.
Advantages
- Very simple to very complex design possibilities
- Easy to make a 3 or 4 degree of freedom robot arm (two joints and turning base)
Disadvantages
- Stationary unless mounted on a mobile platform
- Cost to build is proportional to lifting capability
Practical Example
In our case, we have opted for building a robot that will provide the maximum exposure to robotics. A programmable tracked platform that can accommodate a variety of sensors and gripper sees ideal in this case, specially since we consider tank tracks are far cooler than wheels.
In order to keep the costs down, we opted to build a small desktop robot that will be able to roam indoors and on tabletops. We also have taken into consideration the fact that there are not many tracks available, and to keep things simple, we’ll only consider a single drive sprocket and single idler sprocket system, this should not be a problem since the robot will be very light weight.
The preliminary CAD below summarized the features describes so far.

How to Make a Robot – Lesson 3: Making Sense of Actuators
Posted on September 2nd, 2010 in How To Make a Robot

Lessons Menu:
- Lesson 1 – Getting Started
- Lesson 2 - Choosing a Robotic Platform
- Lesson 3 - Making Sense of Actuators
- Lesson 4 - Understanding Microcontrollers
- Lesson 5 - Choosing a Motor Controller
- Lesson 6 - Understanding Communication Methods
- Lesson 7 - Using Sensors
- Lesson 8 - Getting the Right Tools
- Lesson 9 - Assembling a Robot
- Lesson 10 - Programming a Robot
Making Sense of Actuators
What is an actuator?
An “actuator” can be defined as a device that converts energy (in robotics, that energy tends to be electrical) into physical motion. The vast majority of actuators produce either rotational or linear motion. For instance, a “DC motor” is therefore a type of actuator.
Choosing the right actuators for your robot requires an understanding of what actuators are available, some imagination, and a bit of math and physics.
Rotational Actuators
As the name indicates, this type of actuators transform electrical energy into a rotating motion. There are two main mechanical parameters distinguishing them from one another: (1) torque, the force they can produce at a given distance (usually expressed in N•m or Oz•in), and (2) the rotational speed (usually measured in revolutions per minutes, or rpm).
AC Motor
 AC (alternating current) is rarely used in mobile robots since most of them are powered with direct current (DC) coming from batteries. Also, since electronic components use DC, it is more convenient to have the same type of power supply for the actuators as well. AC motors are mainly used in industrial environments where very high torque is required, or where the motors are connected to the mains / wall outlet.
DC Motors
 DC motors come in a variety of shapes and sized although most are cylindrical. They feature an output shaft which rotates at high speeds usually in the 5 000 to 10 000 rpm range. Although DC motors rotate very quickly in general, most are not strong (low torque). In order to reduce the speed and increase the torque, a gear can be added.
To incorporate a motor into a robot, you need to fix the body of the motor to the frame of the robot. For this reason motors often feature mounting holes which are generally located on the face of the motor so they can be mounted perpendicularly to a surface. DC motors can operate in clockwise (CW) and counter clockwise (CCW) rotation. The angular motion of the turning shaft can be measured usingencoders or potentiometers.
Geared DC Motors
 A DC gear motor is a DC motor combined with a gearbox that works to decrease the motor’s speed and increase the torque. For example, if a DC motor rotates at 10 000 rpm and produces 0.001 N•m of torque, adding a 256:1 (“two hundred and fifty six to one”) gear down would reduce the speed by a factor of 256 (resulting in 10 000rpm / 256 = 39 rpm), and increase the torque by a factor of 256 (0.001 x 256 = 0.256 N•m). The most common types of gearing are “spur” (the most common), “planetary” (more complex but allows for higher gear-downs in a more confined space, as well as higher efficiency) and “worm” (which allows for very high gear ratio with just a single stage, and also prevents the output shaft from moving if the motor s not powered). Just like a DC motor, a DC gear motor can also rotate CW and CCW. If you need to know the number of rotations of the motor, an “encoder” can be added to the shaft.
R/C Servo Motors

R/C (or hobby) servo motors are types of actuators that rotate to a specific angular position, and were classically used in more expensive remote controlled vehicles for steering or controlling flight surfaces. Now that they are used in a variety of applications, the price of hobby servos has gone down significantly, and the variety (different sizes, technologies, and strength) has increased.
The common factor to most servos is that the majority only rotate about 180 degrees. A hobby servo motor actually includes a DC motor, gearing, electronics and a rotary potentiometer (which, in essence, measures the angle). The electronics and potentiometer work in unison to activate the motor and stop the output shaft at a specified angle. These servos are generally have three wires: ground, voltage in, and a control pulse. The control pulse is usually generated with a servo motor controller. A “robot servo“ is a new type of servo that offers both continuous rotation and position feedback. All servos can rotate CW and CCW.
Industrial Servo Motors
 An industrial servo motor is controlled differently than a hobby servo motor and is more commonly found on very large machines. An industrial servo motor is usually made up of a large AC (sometimes three-phase) motor, a gear down and an encoder which provides feedback about angular position and speed. These motors are rarely used in mobile robots because of their weight, size, cost and complexity. You might find an industrial servo in a more powerful industrial robotic arm or very large robotic vehicles.
Stepper Motors
 A stepper motor does exactly as its name implies; it rotates in specified “steps” (actually, specific degrees). The number of degrees the shaft rotates with each step (step size) varies based on several factors. Most stepper motors do not include gearing, so just like a DC motor, the torque is often low. Configured properly, a stepper can rotate CW and CCW and can be moved to a desired angular position. There areunipolar and bipolar stepper motor types. One notable downside to stepper motors is that if the motor is not powered, it’s difficult to be certain of the motor’s starting angle.
Adding gears to a stepper motor has the same effect as a adding gears to a DC motors: it increases the torque and decreases the output angular speed. Since the speed is reduced by the gear ratio, the step size is also reduced by that same factor. If the non geared down stepper motor had a step size of 1.2 degrees, and you add a gear down of 55:1, the new step size would be 1.2 / 55 = 0.0218 degrees.
Linear Actuators
A linear actuator produces linear motion (motion along one straight line) and have three main distinguishing mechanical characteristics: the minimum and maximum distance the rod can move “a.k.a. the “stroke”, in mm or inches), their force (in Kg or lbs), and their speed (in m/s or inch/s).
DC Linear Actuator
 A DC linear actuator is often made up of a DC motor connected to a lead screw. As the motor turns, so does the lead screw. A traveller on the lead screw is forced either towards or away from the motor, essentially converting the rotating motion to a linear motion. Some DC linear actuators incorporate a linear potentiometer which provides linear position feedback. In order to stop the actuator from destroying itself, many manufacturers include limit switches at either end which cuts power to the actuator when pressed. DC linear actuators come in a wide variety of sizes, strokes and forces.
Solenoids
 Solenoids are composed of a coil wound around a mobile core. When the coil is energized, the core is pushed away from the magnetic field and produces a motion in a single direction. Multiple coils or some mechanical arrangements would be required in order to provide a motion in two directions. A solenoid’s stroke is usually very small but their speed is very fast. The strength depends mainly on the coil size and the current going trough it. This type of actuator is commonly used in valves or latching systems and there is usually no position feedback (it’s either fully retracted or fully extended).
Muscle wire
 Muscle wire is a special type of wire that will contract when an electric current traverses it. Once the current is gone (and the wire cools down) it returns to its original length. This type of actuator is not very strong, fast or provides a long stroke. Nevertheless, it is very convenient when working with very small parts or in a very confined space.
Pneumatic and Hydraulic
 Pneumatic and hydraulic actuators use air or a liquid (e.g. water or oil) respectively in order to produce a linear motion. These types of actuators can have very long strokes, high force and high speed. In order to be operated they require the use of a fluid compressor which makes them more difficult to operate than regular electrical actuators. Because of they high force speed and generally large size, they are mainly used in industrial environments.
Choosing an Actuator
To help you with the selection of an actuator for a specific task, we have developed the following questions to guide you in the right direction.
It is important to note that there are always new and innovative technologies being brought to market and nothing is set in stone. Also note that an single actuator may perform very different task in different contexts. For instance, with additional mechanics, an actuator that produces linear motion may be used to rotate an object and vice versa (like on a car’s windshield wiper).
(1) Is the actuator being used to move a wheeled robot?

Drive motors must move the weight of the entire robot and will most likely require a gear down. Most robots use “skid steering” while cars or trucks tend to use rack-and-pinion steering. If you choose skid steering, DC gear motors are the ideal choice for robots with wheels or tracks as they provide continuous rotation, and can have optional position feedback using optical encoders and are very easy to program and use. If you want to use rack-and-pinion, you will need one drive motor (DC gear is also suggested) and one motor to steer the front wheels). For stirring, since the rotation required is restricted to a specific angle, an R/C servo would be the logical choice.

(2) Is the motor being used to lift or turn a heavy weight?
Lifting a weight requires significantly more power than moving a weight on a flat surface. Speed must be sacrificed in order to gain torque and it is best to use a gearbox with a high gear ratio and powerful DC motor or a DC linear actuator. Consider using system (either with worm gears, or clamps) that prevents the mass from falling in case of a power loss.

(3) Is the range of motion limited to 180 degrees?
If the range is limited to 180 degrees and the torque required is not significant, an R/C servo motor is ideal. Servo motors are offered in a variety of different torques and sizes and provide angular position feedback (most use a potentiometer, and some specialized ones use optical encoders). R/C servos are used more and more to create small walking robots.

(4) Does the angle need to be very precise?
Stepper motors and geared stepper motors (coupled with astepper motor controller) can offer very precise angular motion. They are sometimes preferred to servo motors because they offer continuous rotation. However, some high-end digital servo motors use optical encoders and can offer very high precision.
 (5) Is the motion in a straight line?
Linear actuators are best for moving objects and positioning them along a straight line. They come in a variety of sizes and configurations. Muscle wire should be considered only if your motion requires very little force. For very fast motion, consider pneumatics or solenoids, and for very high forces, consider DC linear actuators (up to about 500 pounds) and then hydraulics.
Tools
 In order to compute the strength (or torque), and speed required for your application, many (rather complex) computations are required involving the physics of the machine to be created. In order to simplify the design process, we have put together a few tools that can help you out.
- DC Drive Motor Selector (useful for robots with wheels or tracks). Also consult the Drive Motor Sizing Tutorial for further details.
- Robot Leg Torque Tutorial
- Robot Arm Torque Calculator
Practical Example
First, let us determine the type of actuators that would be required by answering the five aforementioned questions:
- Is the actuator being used to move a wheeled robot?
Yes. A DC gear motor is the suggested type of actuator and skid steering is appropriate for a tank, which means that each track will need it;s own motor. - Is the motor being used to lift or turn a heavy weight?
No, a desktop rover should not be heavy. - Is the range of motion limited to 180 degrees?
No, the wheels need to urn continuously. - Does the angle need to be precise?
No, our robot does not require positional feedback. - Is the motion in a straight line?
No, since we want the robot to turn and move in all directions.
Since rotating a wheel needs rotational motion, we could quickly eliminate all linear actuators and choose a DC gear motor. The next logical question was “which one?” A search online shows that there are not too many track systems intended for small robots, which in itself would restrict which motors we could consider.
The Currently Available Track Systems
 At 2″ and 3″ wide, the Lynxmotion tracks are more intended for medium sized robots, so we’ll omit them. The price does fall within the budget though.
The Vex Tank Tread Kit is definitely a good option, but it would restrict us to one specific motor.
The Tamiya Track and Wheel Set is definitely a good option, and would limit our choices to Tamiya motors and gearboxes. This would also be within the budget.
There are several Johnny Robot Track Kits, one for a Hitec continuous rotation servo(which is essentially a gear motor in a servo’s body) another for a Futaba continuous rotation servo, one for Tamiya motors and another for Pololu or Solarbotics motors. This is definitely a good option and also within our budget. Mainly because of aesthetic and motor compatibility reasons, we are going to stick with this choice.

There is always the option of hacking a toy such as an R/C tank and convert it into a robot. This option would also give us compatible motors, however, the objective is to design our own robot and not hack another product.
Computing the motor requirements
The next step is to fill out the DC Drive Motor Selector Tool, using approximate values.

Data Details
- Total mass of robot: 200 g should include everything: motors, frame, batteries and all.
- Number of drive motors: Two motors are required for skid steering.
- Radius of drive wheel: from 0.5” to about 1” should be an appropriate size for a desktop robot.
- Velocity of robot: 0.2 m/s would be nice for a desktop robot.
- Maximum incline: Climbing some books would be cool, let us choose 30 degrees.
- Supply Voltage: Uncertain at the moment, so we choose the default 12 V
- Desired Acceleration: Not sure, so choose default 0.2 m/s2
- Desired operating time: 30 minutes is reasonable between charges.
- Total efficiency: Not sure, so we choose default 65%
Using 0.5 as the wheel radius we obtain 150 rpm @ 1.4 oz-in. When using 1”, the calculator provides 75rpm @ 2.8 oz-in.
Selecting the Motor

Thus, the motors we are looking for must turn at approximately 150 rpm and provide roughly 1.4123 oz-in of torque. We can use the DC motor Comparison Table in order to find the appropriate motor.
There are many motors available that fit the Johnny Robot Track Kit :
The Solarbotics GM8 and GM9 feature 70 rpm @ 43 oz-in and 66 rpm at 43 oz-in respectively. Both sell for $5.46 each.
All Tamiya gearbox ad motor combinations sell for approximately $11 and up and provide a wide range of torques and speeds.
Hitec continuous rotation servo and Futaba continuous rotation servos sell for $17 and $14 respectively.
In the end, we opted to use a pair of Solarbotics GM9in order to use skid-drive, mainly because of their low cost.
It is important to note that although the calculator specified we needed about 150rpm, we chose the motor anyway, knowing it would move at about half the original (desired) velocity. The torque produced by this motor is significantly greater than what we needed, which means it can carry additional weight, or climb stepper angles.

How to Make a Robot – Lesson 4: Understanding Microcontrollers
Posted on October 12th, 2010 in How To Make a Robot, Microcontrollers

Lessons Menu:
- Lesson 1 – Getting Started
- Lesson 2 - Choosing a Robotic Platform
- Lesson 3 - Making Sense of Actuators
- Lesson 4 - Understanding Microcontrollers
- Lesson 5 - Choosing a Motor Controller
- Lesson 6 - Understanding Communication Methods
- Lesson 7 - Using Sensors
- Lesson 8 - Getting the Right Tools
- Lesson 9 - Assembling a Robot
- Lesson 10 - Programming a Robot
Understanding Microcontrollers

What is a microcontroller?
You might be asking yourself what is a microcontroller and what does it do?
A microcontroller is a computing device capable of executing a program (i.e. a sequence of instructions) and is often referred to as the “brain” or “control center” in a robot since it is usually responsible for all computations, decision making, and communications.
In order to interact with the outside world, a microcontroller possesses a series of pins (electrical signal connections) that can be turned HIGH (1/ON), or LOW (0/OFF) through programming instructions. These pins can also be used to read electrical signals (coming form sensors or other devices) and tell whether they are HIGH or LOW.

Most modern microcontrollers can also measure analogue voltage signals (i.e. signals that can have a full range of values instead of just two well defined states) through the use of an Analogue to Digital Converter (ADC). By using the ADC, a microcontroller can assign a numerical value to an analogue voltage that is neither HIGH nor LOW.
What can a microcontroller do?
Although microcontrollers can seem rather limited at first glance, many complex actions can be achieved by setting the pins HIGH and LOW in a clever way. Nevertheless, creating very complex algorithms (such as advanced vision processing and intelligent behaviours) or very large programs may be simply impossible for a microcontroller due to its inherent resource and speed limitations.
For instance, in order to blink a light, one could program a repeating sequence where the microcontrollers turns a pin HIGH, waits for a moment, turns it LOW, waits for another moment and starts again. A light connected to the pin in question would then blink indefinitely.
In a similar way, microcontrollers can be used to control other electrical devices such as actuators (when connected to motor controllers), storage devices (such as SD cards), WiFi or Bluetooth interfaces, etc. As a consequence of this incredible versatility, microcontrollers can be found in everyday products. Practically every home appliance or electronic device uses at least one (often many) microcontroller. For instance TV sets, washing machines, remote controls, telephones, watches, microwave ovens, and now robots require these little devices to operate.
Unlike microprocessors (e.g. the CPU in personal computers), a microcontroller does not require peripherals such as external RAM or external storage devices to operate. This means that although microcontrollers can be less powerful than their PC counterpart, developing circuits and products based on microcontrollers is much simpler and less expensive since very few additional hardware components are required.
It is important to note that a microcontroller can output only a very small amount of electrical power through its pins; this means that a generic microcontroller will likely not be able to power electrical motors, solenoids, large lights, or any other large load directly. Trying to do so may even cause physical damage to the controller.
What are the more specialized features in a microcontroller?
Special hardware built into the microcontrollers means these devices can do more than the usual digital I/O, basic computations, basic mathematics, and decision taking. Many microcontrollers readily support the most popular communication protocols such as UART(a.k.a. serial or RS232), SPI and I2C.This feature is incredibly useful when communicating with other devices such as computers, advanced sensors, or other microcontrollers. Although it is possible to manually implement these protocols, it is always nice to have dedicated hardware built-in that takes care of the details. It allows the microcontroller to focus on other tasks and allows for a cleaner program.
Analogue-to-digital converters (ADC) are used to translate analogue voltage signals to a digital number proportional to the magnitude of the voltage, this number can then be used in the microcontroller program. In order to output an intermediate amount of power different from HIGH and LOW, some microcontrollers are able to use pulse-width modulation (PWM). For example this method makes it possible to smoothly dim an LED.
Finally, some microcontrollers integrate a voltage regulator in their development boards. This is rather convenient since it allows the microcontroller to be powered by a wide range of voltages that do not require you to provide the exact operating voltage required. This also allows it to readily power sensors and other accessories without requiring an external regulated power source.
Analogue or Digital?
Below you can find two examples that illustrate when to use a digital or analogue pin:
 Digital: A digital signal is used in order to assess the binary state of a switch. As illustrated below (on the left side of the solderless breadboard), a momentary switch or push button closes a circuit when pressed, and allows current to flow (a pull-up resister is also shown). A digital pin connected (through a green wire in the picture) to this circuit would return either LOW or 0 (meaning that the voltage at the pin is in the LOW range, 0V in this case) or a HIGH (meaning the button is pressed and the voltage is at the HIGH range, 5V in this case).
- Analogue: A variable resistor or potentiometer (as shown towards the right side of the board below) is used to provide an analogue electrical signal proportional to a rotation (e.g. the volume knob on a stereo). As illustrated below, when a potentiometer is connected to a 5V supply and the shaft is turned, the output will vary between 0 and 5V, proportionally to the angle of rotation. The ADC on a microcontroller interprets the voltage and converts it to a numeric value. For example, a 10-bit ADC converts 0V to the value “0”, 2.5V to “512” and 5V to “1023”. Therefore if you suspect the device you plan to connect will provide a value that is proportional to something else (for example temperature, force, position), it will likely need an analogue pin.


What about programming?
 Being afraid of programming microcontrollers is getting old fashioned. Unlike the “old days” where making a light blink took advanced knowledge of the microcontroller and several dozen lines of code (not to mention parallel or serial cables connected to huge development board), programing a microcontroller is very simple thanks to modern Integrated Development Environments (IDE) that use up-to-date languages, fully featured libraries that readily cover all of the most common (and not so common) action, and several ready-made code examples to get beginners started.
Now-a-days, microcontrollers can be programmed in various high-level languages including C, C++, C#, Processing (a variation of C++), Java, Python, .Net, and Basic. Of course, it is always possible to program them in Assembler but this privilege is reserved for more advanced users with very special requirements (and a hint of masochism). In this sense, anyone should be able to find a programming language that best suit their taste and previous programming experience.
IDEs are becoming even simpler as manufacturers create graphical programming environments. Sequences which used to require several lines of code are reduced to an image which can be connected to other “images” to form code. For example, one image might represent controlling a motor and the user need only place it where he/she wants it and specify the direction and rpm.
On the hardware side, microcontroller developments boards add convenience and are easier to use over time. These boards usually break out all the useful pins of the microcontroller and make them easy to access for quick circuit prototyping. They also provide convenient USB power and programming interfaces that plug right into any modern computer.
For those unfamiliar with the term, a Development Board is a circuit board that provides a microcontroller chip with all the required supporting electronics (such as voltage regulator , oscillators, current limiting resistors, and USB plugs) required to operate. If you are not planning to design your own support circuit, buying a development board is preferable to simply getting a single microcontroller chip.
Note: Robot programming is covered in greater depth in Lesson 10.
Why not use a standard computer?
 It is apparent that a microcontroller is very similar to a PC CPU or microprocessor, and that a development board is akin to a Computer motherboard. If this is the case, why not simply use a full computer to control a robot?
As a matter of fact, in more advanced robots, especially those that involve complex computing and vision algorithms, the microcontroller is often replaced (or supplemented) with a standard computer. A desktop computer includes a motherboard, a processor, a main storage device (such as a hard drive), video processing (on-board or external), RAM, and of course peripherals such as monitor, keyboard, mouse etc. This type of system is usually more expensive, physically larger, more power hungry. The main differences are highlighted in the table below.
Microcontroller | Personal Computer | |
Example | Atmega328 | Intel Pentium Core 2 Duo |
RAM | 1KB | 4000000KB (4GB) |
Storage | 15KB | 15000000KB (1000GB) |
Power | 0.1W | 600W |
Voltage | 12 | 12 |
Input/Output | Pins | USB, RS232 |
Wireless | Bluetooth*, RF* | Bluetooth |
Video | None | 1000000KB (1GB) |
Price | $400 to $2000 | |
Internet | WiFi* or Ethernet* | WiFi or Ethernet |
*Available as optional additions on many microcontrollers. |
Choosing the right Microcontroller
Unless you are into BEAM robotics, or plan to control your custom robot using a tether or an R/C system (which, based on our definition from Lesson 1 would not be considered a robot), you will need a microcontroller for any robotic project. For a beginner, choosing the right microcontroller may seem like a daunting task, especially considering the range of products, specifications and potential applications. There are many different microcontrollers available on the market: Arduino, BasicATOM, BasicX, POB Technology, Pololu, Parallax and more. When considering the right microcontroller, ask yourself the following questions:
- Which microcontroller is the most popular for my application?
Of course making robots or electronic projects in general is not a popularity contest, but the fact that a microcontroller has a large supporting community or has been successfully used in a similar (or even the same) situation could simplify your design phase considerably. This way, you could benefit from other user’s experience and among hobbyists. It is common for robot builders to share results, code, pictures, videos, and detail successes and even failures. All this available material and the possibility of receiving advice from more experienced users can prove very valuable. - Does it have any special features the robot requires?
As popular as a microcontroller might be, it must be able to perform all the special actions required for your robot to functions properly. Some features are common to all microcontrollers (e.g. having digital inputs and outputs, being able to perform simple mathematical operations, comparing values and taking decisions), while others need specific hardware (e.g ADC, PWM, and communication protocol support). Also memory and speed requirements, as well as pin count should be taken into consideration. - Are the accessories I need available for a particular microcontroller?
If your robot has special requirements or there is a particular accessory or component that is crucial for your design, choosing a compatible microcontroller is obviously very important. Although most sensors and accessories can be interfaced directly with many microcontrollers, some accessories are meant to interface with a specific microcontroller and even provide out-of-the-box functionally or sample code.
What does the future hold?
As the price of computers has gone down, and advances in technology make them smaller and more energy efficient, single-board computer have emerged as an attractive option for robots. These single-board computers are essentially computers you may have used about 5 years ago, and incorporate many devices into one board (so you cannot swap anything out). They can run a complete operating system (Windows and Linux are most common) and can connect to external devices such as USB peripherals, LCDs etc. Unlike their ancestors, these single-board computers tend to be much more power efficient.
Practical Example
In order to choose a microcontroller, we compiled a list of features / criteria we wanted:
- The microcontroller’s cost must be low while including a development board (below 50$)
- It must be easy to use and well supported. It is also important to have lots of documentation readily available.
- It should be programmed in C or a C-based language.
- It must be popular and have an active user community.
- Since the robot will be used as a general purpose platform, the microcontroller should be very feature rich in order to allow for broad experimentation. In this sense, it should have several analogue and digital pins, as well as an integrated voltage regulator.
Since our robot will use two motors, the microcontroller will need two digital pins for direction control, and two PWM pins for speed control (this will be explained in more detail in Lesson 5). The robot will also transmit and receive data so it will need to support the UART (a.k.a. serial or RS232) communication protocol in our case. We would also like the option of adding other sensors and devices in the future so analogue pins and many extra digital pins would be appropriate.
The upcoming RobotShop Microcontroller comparison table allows us to compare the main features of one microcontroller with another. The Pololu and Arduino microcontrollers seemed to conform best to the above criteria. In order to select a specific microcontroller from these two manufacturers, each was researched in order to determine the amount of available material, code, user community, Google hits and more.

The Arduino Duemilanove (recently replaced by the Arduino Uno) was ultimately chosen based on price vs. features and because of the concept of “shields” (separate accessory boards you plug and stack onto the microcontroller which add specific functionality). Also, Arduino is rather popular, there are many sample projects, and its community is very active.

ليست هناك تعليقات:
إرسال تعليق